
 Reply With Quote
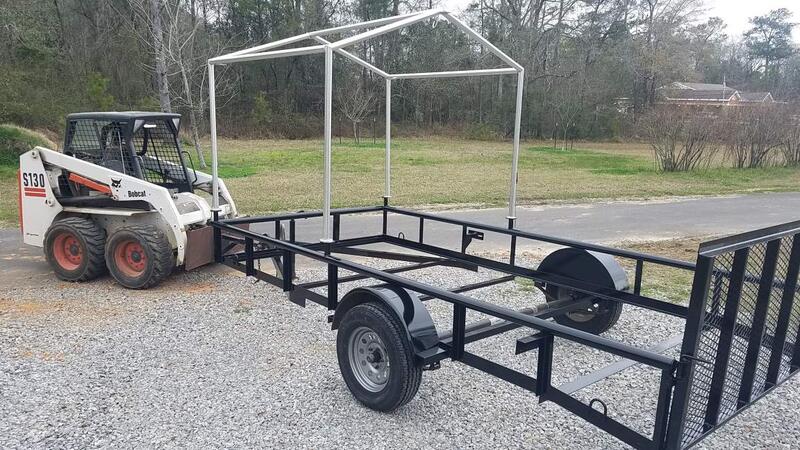
Quick picture with the Canopy frame on top. The Canopy marine vinyl fabric arrived today so I will be working on it along with the refrigerator & refrigerator hole.

 HaHa: 0
 Super Moderator
* Crappie.com Supporter
Super Moderator
* Crappie.com Supporter
 Crappie.com 2K Star General
Quick picture with the Canopy frame on top. The Canopy marine vinyl fabric arrived today so I will be working on it along with the refrigerator & refrigerator hole.
Crappie.com 2K Star General
After looking all over this morning for the ARP Fridge Defend controller for the camper fridge unsuccessfully I switched over the the Canvas Top for the Hog Fest Trailer. I have never sewn Weblon Regatta Marine vinyl before but it sews very nice. To walk you thru the steps to making a well fitting marine canvas it starts with a very well fitted pattern.
I use house wrap to make patterns so every marine canvas I make I can make a duplicate. After getting the house wrap clamped tight to the frame I trace the finished edge onto the wrap with a sharpie.
After removing the pattern I lay it out on the sewing table to straighten out all the lines with a long straight edge. I also mark any obstruction to a grommet so here the center pipe would be in the way of the lacing so I X it out.
The corners need some kind of radius. Since I didn't bend the pipes but welded a square edge I have no bent radius to match so I just add something I can make the turn on with the sewing machine.
Reinforcing the edge of a marine canvas allows it to be laced on Banjo Tight. Here I'm cutting two 2in strips that will be sewn on as a reinforcement where the grommets go. Cutting it off the side of the entire roll before cutting the fabric prevents the need for piecing later.
The most waterproof seam is a Double Fold Felled Seam. Here I attach the two halves with Basting Tape so they don't move while sewing. I sew the first stitch run 1-1/2 inches from the longest edge. Then baste the flap with tape before folding it over to the seam I just stitched. After folding the flap over I add another run of tape then fold the top piece over flat pressing the seam flat as I stretch it out.
My machine was a bit dry, not a lot of sewing these days so I had to stop and do a full service before running the rest of the canvas.
The first picture I'm sewing the first stitch, the second & third I'm doing the second stitch. It only shows one stitch on top. That second stitch I try to run right down the edge of the fold as straight as possible. When sewing such a large canvas it helps to fold it so it will slide better.
Now I can lay the pattern on top of the piece of canvas centering the center pipe with the center seam and trace the pattern on to the canvas. I use the books as center weights and tape the edges of the pattern as flat as possible. After tracing I again straighten all the lines out before cutting out the Top.
Now the 2 inch reinforcement strips are basted in so they don't move while sewing. I first sew the entire outside edge then baste and sew the inside edge. A Binding trim will be added to the outer edges tomorrow. I had to go look at a Yamaha F250 this afternoon the hydraulics is having issues. It's on a 33ft boat so I may be using my waders tomorrow.
Laying out the grommets takes focus, focus I don't have anymore of today so Tripletail here I come.
Super Moderator
* Crappie.com Supporter
Amazes me all you can do. Truly an artist.

BuckeyeCrappie LIKED above post
Rojo thanked you for this post
Super Moderator
* Crappie.com Supporter
Definitely a handy man to have around
The love for fishing is one of the best gifts you can pass along
Super Moderator
* Crappie.com Supporter * Member Sponsor
Very nice sir!
If your too busy to fish, youre too busy! Buddy Ebsen
PROUD MEMBER OF TEAM GEEZER
(Billbob and G approved!)
Proud member of Tekeums Jigs Pro
Staff
https://heavenornot.net/
heavenornot.net
Crappie.com Legend
* Crappie.com Supporter
Crappie.com 1K Star General
Crappie.com 2K Star General
Got up this morning and added a sewn on the edge binding to give the canvas a professional edge treatment.
The walls in my log home reflect little light, in fact it's kinda dark. I'm lightening the photos as much as I can without totally washing them out. You can see the Binding Attachment guides the canvas while folding the Binding right before the needle. You can't install binding well without a Binding Attachment. The finished edge is nice and clean.
I did a 3 inch Grommet spacing since this trailer will be pulled on the Interstate.
Using a Press-N-Snap tool with hole punch dies and #1 Grommet install dies I punch the holes and install the grommets.
Of course the canvas fits perfectly. There is no replacement for patterning a canvas job for a perfect fit every time. My hand strength is not what it used to be so the tiewraps will hold the canvas in position while I lace it with Parachute cord, tomorrow - not today. The press-N-Snap killed my hands, with the thumb troubles I'm having on both hands (the abuse never ends) I have to pick my fights these days. Lacing, you must hold tension constantly for about a hour to finish a run this long.
Super Moderator
* Crappie.com Supporter
Curious will that stretch any over time and have to be laced again? Looks good John.


