
 Crappie.com 2K Star General

Introduction - So in 1979 212 of these cars were made. They start out life as a Cadillac Seville, then the car gets a channeling job removing the rear door section completely and the balance is moved forward and welded to the front door pillars. The roof gets chopped next and the Landau Top added, finally the entire front Clip is stretched quite some distance (you can't even see the radiator cap) extended cooling hoses, HVAC lines, transmission lines, etc completing the mod is a entire fiberglass front cap. I have already started the mods to bring the car back to life and over the next few weeks will catch everyone up to where I am now. It needs to be said here so the rest of the work is understood, THIS is the Biggest LEMON Cadillac Ever Made. First Fuel Injection Cadillac. The injectors were fired from micro switches in the distributor. Since the base engine is a Oldsmobile 350 there is plenty to work with within this resurrection.
Super Moderator
* Crappie.com Supporter * Member Sponsor
If your too busy to fish, youre too busy! Buddy Ebsen
PROUD MEMBER OF TEAM GEEZER
(Billbob and G approved!)
Proud member of Tekeums Jigs Pro
Staff
https://heavenornot.net/
heavenornot.netRojo LIKED above post
Super Moderator
* Crappie.com Supporter
Super Moderator
* Crappie.com Supporter
Interesting car
The love for fishing is one of the best gifts you can pass alongRojo thanked you for this post
Crappie.com 2K Star General
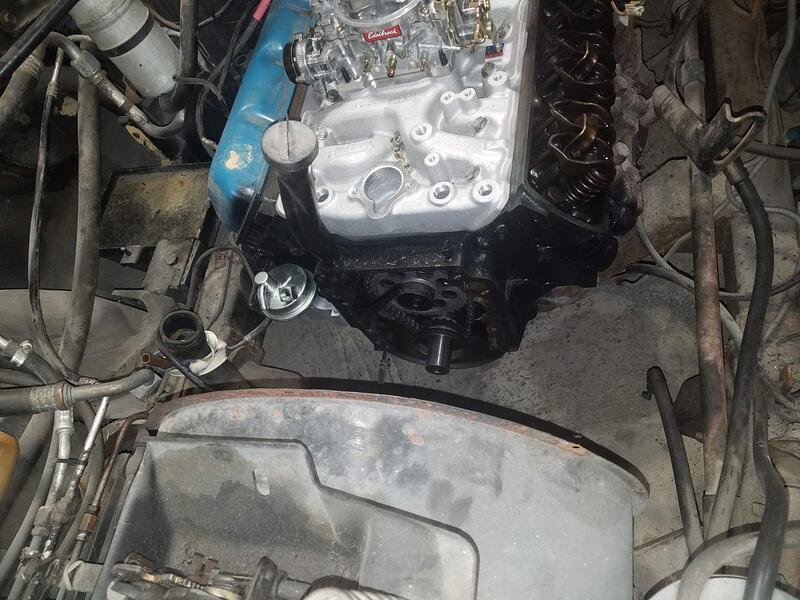
Theses cars are not the most attractive on the road today. "Crusin The Coast" Cruisin' The Coast | America's Largest Block Party is a real Big Deal here. A gangster ride like this you just don't see. Rust surrounds the bottom of the vinyl top, my plan is to remove the vinyl top and trim pins and after repairing the rust refinish the top only in Black Chrome. This car has only 16,000 original miles on it. I've started the engine retrofit from Fuel Injection to Carb. Here are a couple of pictures. Being a 1979 it had a Nylon Timing Gear, not chancing a "Jump Time" situation with that old gear the Timing Set was replaced right away.
Crappie.com 2K Star General
It has been difficult to say the least working on the front of the engine with the Fan Shroud Extension, Forward Extension Brace, etc in the way. I don't want to drop the oil pan just to put the Timing Cover back on. After a little work I found the Grille rotates up allowing access to the forward Cap Extension mounting screws.
Check out the distance the Frontend has been extended. Also the length and size of the Fan Shroud Extension.
I got a bit of cleaning to do. Good news standing in front of the engine I was able to push the Timing Cover enough the bottom lip went in the oil pan like it is supposed to.
Super Moderator
* Crappie.com Supporter
Nice looking components on the top of that motor
The love for fishing is one of the best gifts you can pass along
Crappie.com 2K Star General
The engine's fuel injection was a lemon. No parts available. I had to go aftermarket. Made more headway but working on another project at the same time today.Originally Posted by DockShootinJack

Super Moderator
* Crappie.com Supporter * Member Sponsor
That’s a long nose area for sure. I can see why the shroud extension is needed.
If your too busy to fish, youre too busy! Buddy Ebsen
PROUD MEMBER OF TEAM GEEZER
(Billbob and G approved!)
Proud member of Tekeums Jigs Pro
Staff
https://heavenornot.net/
heavenornot.net
Crappie.com 2K Star General
Having to go to Sam's to get new tires installed for another car, go to our local HVAC Warehouse to get prices for a new 2 ton Split System for a friend and pick up money from the Manager of the HVAC place (another friend) who didn't pick up his Propeller another friend fixed for me, for him. Drive to the next town where the Prop Shop is and back, drop off the prop, pick up the tires, and get home. It just blew up my shop production today.
Yesterday, I was able to get the Timing cover on and paint the Balancer so this afternoon I was able to get the Balancer and Balancer Pulleys on, Timing Marker painted and on, Water Pump on and start making the planned conversion to electric fan cooled Radiator. The whole ride will look better under the hood without the Fan Clutch driven Fan system.
I use PVC fittings to install seals over shafts, it works great.
The balancer was rough, inside and out. I had to sit with 320 grit emery cloth and sand the rust off the Seal area then polish with 500 grit before blasting and painting.
The speciality bolts were just nasty too like most things under the hood. I used my trusty (bought new in 1977) Harbor Freight Grinder. They used to main out these newspaper like flyers back then and the tools were good quality, at least everything I ordered. I wire wheeled the bolts then used them to install the Water Pump.
Posting Permissions


 HaHa:
HaHa: 
 Reply With Quote
