 HaHa:
HaHa: 
 Reply With Quote
Midwest Airbrush is another. Check out Turbo Dork Paints….also Dixie Art Airbrush..
Turbo Dork
https://www.dixieart.com/

 Crappie.com 2K Star General

I just got on it, great looking site and I didn't know it existed. Paint Spray Gun, Airbrush Paint Kit, Compressors
 Super Moderator
* Crappie.com Supporter * Member Sponsor
Super Moderator
* Crappie.com Supporter * Member Sponsor
Midwest Airbrush is another. Check out Turbo Dork Paints….also Dixie Art Airbrush..
Turbo Dork
https://www.dixieart.com/
If your too busy to fish, youre too busy! Buddy Ebsen
PROUD MEMBER OF TEAM GEEZER
(Billbob and G approved!)
Proud member of Tekeums Jigs Pro
Staff
https://heavenornot.net/
heavenornot.netRojo thanked you for this post
Super Moderator
* Crappie.com Supporter * Member Sponsor
If your too busy to fish, youre too busy! Buddy Ebsen
PROUD MEMBER OF TEAM GEEZER
(Billbob and G approved!)
Proud member of Tekeums Jigs Pro
Staff
https://heavenornot.net/
heavenornot.net
Crappie.com 2K Star General
Crappie.com 2K Star General
After installing the freshly painted brackets on the Power Steering Pump I had to install the new Pulley. I could only get one 1.25 inches in diameter smaller. The pump should spin well.
It was quite a bit of a time to get all the bracket mounting bolts (numerous) into their respective holes. I was worried the Pulley wouldn't align with the other pulleys but after a couple of hours working the brackets and accessories I got everything to line up great. Tomorrow I will tighten it all up after priming the new Power Steering Pump.
After fitting the Alternator Brackets in place I dropped in the old Alternator for now. After I'm done with Camper roofs I will take the Alternator off, strip the housings, and paint it.
After several trips to the parts store I got a belt that fit perfect using the new pulley.
When I quit this evening the AC Compressor was hanging in the Brackets but the belt would hit the new fuel line I ran when adding the Mechanical Fuel Pump.
Founder Crappie.com Est.1996
Easy fix, a bungy cord, or maybe duct tape. Want it to look classier, try a big wire tie. That's how I'd do it. But I'm sure you'll come up with sumtin a little more elegant!Originally Posted by Rojo


Owner
"Wear your PFD" "No texting n driving" slab
Crappie.com members are the best
Super Moderator
* Crappie.com Supporter * Member Sponsor
Funny! I had to do Multiple trips myself when I added in AC and a better PS pump to the GEO tracker I restored a few years back. My “ restore “ wasn’t as fancy….
If your too busy to fish, youre too busy! Buddy Ebsen
PROUD MEMBER OF TEAM GEEZER
(Billbob and G approved!)
Proud member of Tekeums Jigs Pro
Staff
https://heavenornot.net/
heavenornot.netRojo LIKED above post
Crappie.com 2K Star General
Priming a new power steering pump can be a bit of a pain if you don't do a couple of things first. I use a piece of hose slipped over the power steering pump shaft and a step drill bit in the other end of the hose clamping them both tightly. Using a vacuum gun (looks like a grease gun but pulls a vacuum) I slip the suction hose over the return line out of the pump and suck fluid thru the pump internally. Afterwards I place a hose over the return line but wedge the other end higher than the filler cap.
After that is done I remove the pressure line at the power steering gear, adapt that end of the hose over to a barb and connect the vacuum gun there and pull fluid from the pressure port on the pump to the steering gear.
The return line from the steering gear is routed to a catch pan.
Then using a cordless drill on the end of the drill bit I start out slow at first then speed up till clean fluid is running in the catch pan. Sometimes using this method I have to stop and fill the pump because you do not want to allow the pump to suck air, not at all.
Just dispose of the contaminated fluid. This must be done if you expect the warranty of your new pump to be valid.
After I installed the Power Steering Pump Pulley I installed all the belts and tightened them up.
The engine is all wired up, I followed the Ed Mose approach to dealing with fuel lines in the way I tie wrapped them up. She won't start, spit back thru the carb on me, kinda like a tight exhaust valve or something. I don't think the cheap Speedway distributor is right. I got the old distributor last night and will see what it does today.
Crappie.com 2K Star General
Crappie.com 2K Star General
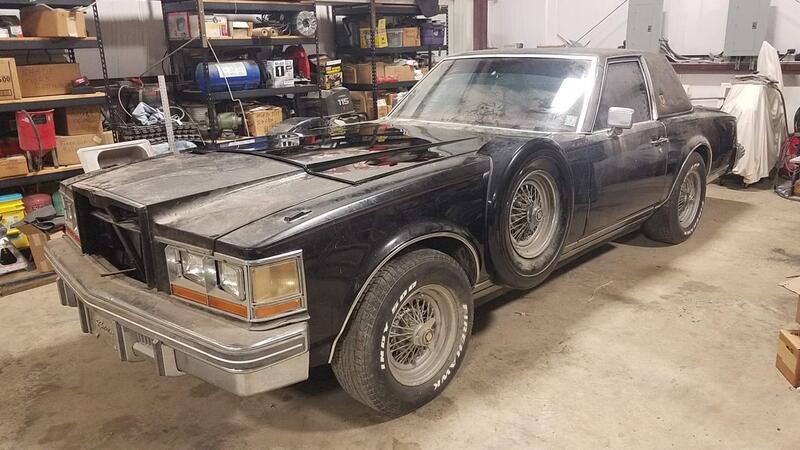
The Batmobile is back together for now, I have to build the Hog Fest Trailer & Replace the roof on our camper before any more work is done to the Caddy. I polished the old paint on the hood and was surprised to how good it came out. The Landau Top is coming off and it will be converted to a hard top.
Posting Permissions


