Page 6 of 7 FirstFirst ... 34567 LastLast
Results 51 to 60 of 67

Thread: 1979 Cadillac Opera Coupe Restoration

  1. #51
    Join Date
    May 2011
    Location
    Kiln, Mississippi
    Posts
    2,760
    Post Thanks / Like

    Default


    I just got on it, great looking site and I didn't know it existed. Paint Spray Gun, Airbrush Paint Kit, Compressors

  2. #52
    BuckeyeCrappie's Avatar
    BuckeyeCrappie is online now Super Moderator * Crappie.com Supporter * Member Sponsor
    Join Date
    Jun 2019
    Location
    Rutland, OH
    Posts
    34,225
    Post Thanks / Like

    Default

    Midwest Airbrush is another. Check out Turbo Dork Paints….also Dixie Art Airbrush..

    Turbo Dork

    https://www.dixieart.com/
    “If your too busy to fish, you’re too busy!” Buddy Ebsen
    PROUD MEMBER OF TEAM GEEZER
    (Billbob and “G” approved!)
    Proud member of Tekeum’s Jigs Pro
    Staff

    https://heavenornot.net/

    heavenornot.net
    Thanks Rojo thanked you for this post

  3. #53
    BuckeyeCrappie's Avatar
    BuckeyeCrappie is online now Super Moderator * Crappie.com Supporter * Member Sponsor
    Join Date
    Jun 2019
    Location
    Rutland, OH
    Posts
    34,225
    Post Thanks / Like

    Default

    “If your too busy to fish, you’re too busy!” Buddy Ebsen
    PROUD MEMBER OF TEAM GEEZER
    (Billbob and “G” approved!)
    Proud member of Tekeum’s Jigs Pro
    Staff

    https://heavenornot.net/

    heavenornot.net
    Thanks Rojo thanked you for this post

  4. #54
    Join Date
    May 2011
    Location
    Kiln, Mississippi
    Posts
    2,760
    Post Thanks / Like

    Default

    Dixie Art is a local in New Orleans, been shopping there for 30+ years. Great shop!

  5. #55
    Join Date
    May 2011
    Location
    Kiln, Mississippi
    Posts
    2,760
    Post Thanks / Like

    Default Installing all the Brackets and Accessories on the Front of the Engine

    Name:  Power Steering 1.jpg
Views: 86
Size:  64.5 KBName:  Power Steering 2.jpg
Views: 83
Size:  68.8 KBName:  Power Steering 3.jpg
Views: 81
Size:  53.9 KBName:  Power Steering 4.jpg
Views: 78
Size:  73.8 KBName:  Power Steering 5.jpg
Views: 82
Size:  68.4 KBName:  Power Steering 6.jpg
Views: 80
Size:  61.3 KBName:  Power Steering 7.jpg
Views: 77
Size:  64.5 KB

    After installing the freshly painted brackets on the Power Steering Pump I had to install the new Pulley. I could only get one 1.25 inches in diameter smaller. The pump should spin well.

    Name:  Power Steering 8.jpg
Views: 80
Size:  71.6 KBName:  Power Steering 9.jpg
Views: 81
Size:  67.7 KB

    It was quite a bit of a time to get all the bracket mounting bolts (numerous) into their respective holes. I was worried the Pulley wouldn't align with the other pulleys but after a couple of hours working the brackets and accessories I got everything to line up great. Tomorrow I will tighten it all up after priming the new Power Steering Pump.

    Name:  Alternator 1.jpg
Views: 78
Size:  55.9 KBName:  Alternator 2.jpg
Views: 76
Size:  76.3 KB

    After fitting the Alternator Brackets in place I dropped in the old Alternator for now. After I'm done with Camper roofs I will take the Alternator off, strip the housings, and paint it.

    Name:  Belts Fit.jpg
Views: 79
Size:  76.2 KB

    After several trips to the parts store I got a belt that fit perfect using the new pulley.

    Name:  AC Brackets 1.jpg
Views: 80
Size:  79.4 KB

    When I quit this evening the AC Compressor was hanging in the Brackets but the belt would hit the new fuel line I ran when adding the Mechanical Fuel Pump.
    Likes SuperDave336, BuckeyeCrappie, S10CHEVY LIKED above post

  6. #56
    Join Date
    Apr 1996
    Location
    Central Florida
    Posts
    26,070
    Post Thanks / Like

    Default

    Quote Originally Posted by Rojo View Post

    Name:  AC Brackets 1.jpg
Views: 80
Size:  79.4 KB

    When I quit this evening the AC Compressor was hanging in the Brackets but the belt would hit the new fuel line I ran when adding the Mechanical Fuel Pump.
    Easy fix, a bungy cord, or maybe duct tape. Want it to look classier, try a big wire tie. That's how I'd do it. But I'm sure you'll come up with sumtin a little more elegant!
    Owner
    "Wear your PFD" "No texting n driving" slab
    Crappie.com members are the best
    Thanks Rojo thanked you for this post

  7. #57
    BuckeyeCrappie's Avatar
    BuckeyeCrappie is online now Super Moderator * Crappie.com Supporter * Member Sponsor
    Join Date
    Jun 2019
    Location
    Rutland, OH
    Posts
    34,225
    Post Thanks / Like

    Default

    Quote Originally Posted by Slab View Post
    Easy fix, a bungy cord, or maybe duct tape. Want it to look classier, try a big wire tie. That's how I'd do it. But I'm sure you'll come up with sumtin a little more elegant!
    Funny! I had to do Multiple trips myself when I added in AC and a better PS pump to the GEO tracker I restored a few years back. My “ restore “ wasn’t as fancy….
    “If your too busy to fish, you’re too busy!” Buddy Ebsen
    PROUD MEMBER OF TEAM GEEZER
    (Billbob and “G” approved!)
    Proud member of Tekeum’s Jigs Pro
    Staff

    https://heavenornot.net/

    heavenornot.net
    Likes Rojo LIKED above post

  8. #58
    Join Date
    May 2011
    Location
    Kiln, Mississippi
    Posts
    2,760
    Post Thanks / Like

    Default My Way of Priming a New Power Steering Pump and Flushing System

    Name:  Priming Power Steering Pump 1.jpg
Views: 56
Size:  38.0 KB

    Priming a new power steering pump can be a bit of a pain if you don't do a couple of things first. I use a piece of hose slipped over the power steering pump shaft and a step drill bit in the other end of the hose clamping them both tightly. Using a vacuum gun (looks like a grease gun but pulls a vacuum) I slip the suction hose over the return line out of the pump and suck fluid thru the pump internally. Afterwards I place a hose over the return line but wedge the other end higher than the filler cap.

    Name:  Priming Power Steering Pump 3.jpg
Views: 55
Size:  50.1 KB

    After that is done I remove the pressure line at the power steering gear, adapt that end of the hose over to a barb and connect the vacuum gun there and pull fluid from the pressure port on the pump to the steering gear.

    Name:  Priming Power Steering Pump 2.jpg
Views: 57
Size:  50.3 KB

    The return line from the steering gear is routed to a catch pan.

    Name:  Priming Power Steering Pump 4.jpg
Views: 57
Size:  53.3 KB

    Then using a cordless drill on the end of the drill bit I start out slow at first then speed up till clean fluid is running in the catch pan. Sometimes using this method I have to stop and fill the pump because you do not want to allow the pump to suck air, not at all.

    Name:  Priming Power Steering Pump 5.jpg
Views: 58
Size:  39.5 KB

    Just dispose of the contaminated fluid. This must be done if you expect the warranty of your new pump to be valid.

    Name:  All Belts On and Tite.jpg
Views: 53
Size:  91.2 KB

    After I installed the Power Steering Pump Pulley I installed all the belts and tightened them up.

    Name:  Everything Wired Up.jpg
Views: 56
Size:  82.2 KB

    The engine is all wired up, I followed the Ed Mose approach to dealing with fuel lines in the way I tie wrapped them up. She won't start, spit back thru the carb on me, kinda like a tight exhaust valve or something. I don't think the cheap Speedway distributor is right. I got the old distributor last night and will see what it does today.
    Likes S10CHEVY, BuckeyeCrappie LIKED above post

  9. #59
    Join Date
    May 2011
    Location
    Kiln, Mississippi
    Posts
    2,760
    Post Thanks / Like

    Default THE BATMOBILE RUNS!!!!!!!!!!!!!!!

    Likes SuperDave336, BuckeyeCrappie, Slab LIKED above post

  10. #60
    Join Date
    May 2011
    Location
    Kiln, Mississippi
    Posts
    2,760
    Post Thanks / Like

    Default

    The Batmobile is back together for now, I have to build the Hog Fest Trailer & Replace the roof on our camper before any more work is done to the Caddy. I polished the old paint on the hood and was surprised to how good it came out. The Landau Top is coming off and it will be converted to a hard top.
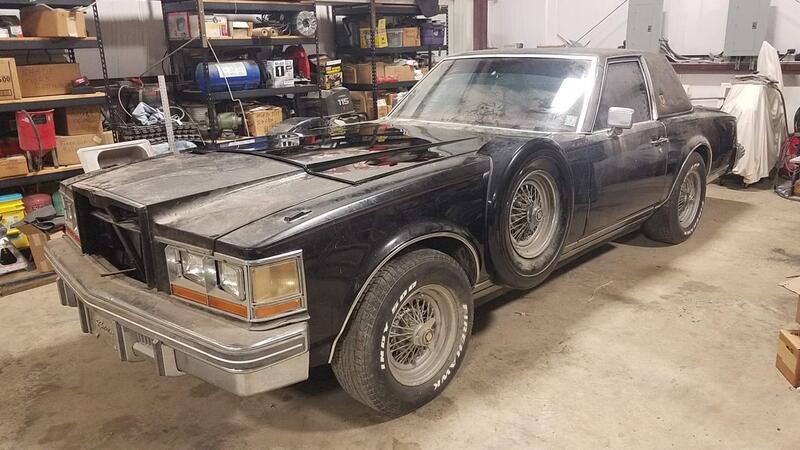
    Name:  The Batmobile is Back Together.jpg
Views: 43
Size:  70.9 KB

Page 6 of 7 FirstFirst ... 34567 LastLast

Tags for this Thread

Posting Permissions

  • You may not post new threads
  • You may not post replies
  • You may not post attachments
  • You may not edit your posts
  •  

BACK TO TOP