 Likes:
 Reply With Quote
Do you have 48 hours in a day?Following


 HaHa: 0
 Crappie.com 2K Star General

Now this is a Monster Mud Boat. No, not really, more like a motorized two man Mud Pirouge.
This is a oldie but a goodie for running rice fields out to your duck blind. The engine deck core rotted so I'm replacing it. Planning on selling this one. I don't use it anymore.
These plunge cutters work fantastic skinning out a transom or like here a deck. Just zip it out but leave a flange to work back to. Transoms I leave a minimum of 2 inch flange mostly a 3in flange is better.
Nothing left in the wood. Since I'm selling I'm using fully dried 1/2 treated plywood for the core going back. When I'm done it will be Bullet Proof. You must grind all the wood off both skins so the resin sticks to fiberglass. The reason the deck rotted was when manufactured the underside back deck at the transom was not sealed.
It's been a while since the Epoxy Cart was T'eed up. Had to run the air scrubber too to collect all the grinding dust. I patterned the original core, cut the back section then split it in the middle for installation. The upper section is cut in 3 pieces so I get a full tight core. A crack in between all the pieces is desirable for thickened resin to be troweled in. Since the inner skin is so thin blocking support from the underside is necessary. Once all the new core is fitted you number it in numerical order before it is reinstalled into the wet resins.
Super Moderator
* Crappie.com Supporter * Member Sponsor
Do you have 48 hours in a day?
If your too busy to fish, youre too busy! Buddy Ebsen
PROUD MEMBER OF TEAM GEEZER
(Billbob and G approved!)
Proud member of Tekeums Jigs Pro
Staff
https://heavenornot.net/
heavenornot.net
Super Moderator
* Crappie.com Supporter
Crappie.com 2K Star General
In my defense I did warn Slab I keep a lot of projects.Originally Posted by BuckeyeCrappie

Crappie.com 2K Star General
Working on the Caddy between curing periods.
First I rolled off enough 1708 S-Glass from the rack to make a complete pass reinforcing the underside Skin. I am supprised on how thin it was. Fitting the 1708 I marked it all the way to the sides trimming off the excess.
After tucking the 1708 S-Glass under the flange I cut a support board to fit just inside the footprint of the lamination at the transom. This is then blocked to the underside supporting the weight of my weights when the first lamination is complete. If I didn't do this step the deck would be very crooked.
During the "Wetting Out" process I couldn't keep taking pictures with resin all over my hands. I mixed a 1% Catalyst Resin, wet the first layer of 1708 out using a wide bondo spreader to push resin under the flange. Then I wet the undersides of each Core piece and in numerical order placed them on the 1708 but inside the flange all the way around. Clamping was accomplished using 2 25# bags of lead shot in boxes and a 30# Dumbell (my Ross Barnett Spillway Anchor).
Round 2, rolling off more 1708 S-Glass and some Fiberglass Mat Tape I started the fitting of the Outer Skin. Since the original core was not fully glassed in properly the Outer Skin has high and low spots. Low spots could and did get built up with hand torn pieces of the Mat Tape but high spots I just had to let go till the final lamination.
The Outer Skin was dry fitted to prevent any surprises after scraping off all the traces of wood left then grinding the skin till I was satisfied the resin would seal the rest up.
I wet the 1708 & torn mat out extra well pushing resin into any void with the bondo spreader. Then I wet the back or underside of the Outer Skin before placing wet side down on the wet fiberglass. Clamping was done the same way, 80#'s of weight was enough to make resin ooze out of some of the cracks.
This has to fully setup and I have to cut all the holes before the final glass work can be done.
Super Moderator
* Crappie.com Supporter
Nice looking mud boat
The love for fishing is one of the best gifts you can pass alongRojo thanked you for this post
Crappie.com 2K Star General
The deck got a good visit with the grinder, it really finds the high and low spots.
After I cut a piece of Chop Mat then tore the edges by hand (if doing a lot pliers work well too) so the edges would blend with the rest of the boat.
After being satisfied the Mat will belnd I tore a few pieces for low spots to fill while glassing. I wet everything out with enough resin to again employ a large Bondo spreader to work out the air bubbles well.
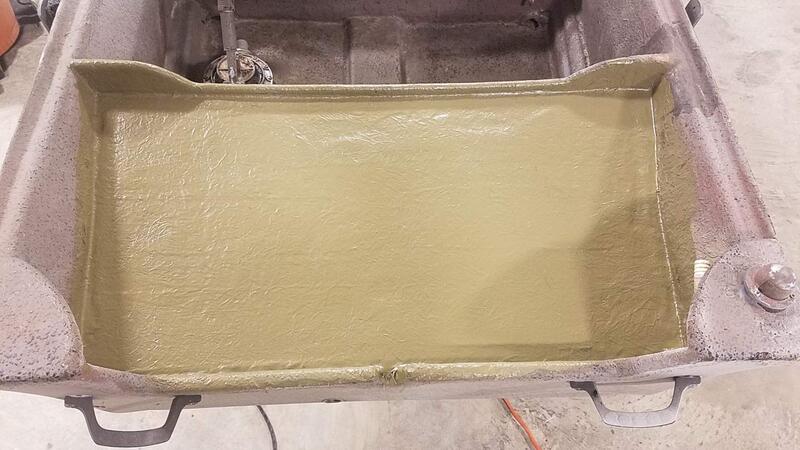
Finally a coat of Duck Boat oil base paint and we are done for now. I have not ran the engine in a few years but it was stored in the AC. I plan on fabricating a new Tiller Handle for it as well as doing some kind of camo paint job to the interior.
Super Moderator
* Crappie.com Supporter
Nice work
The love for fishing is one of the best gifts you can pass along
Crappie.com 2K Star General
Finally got back on the Mud Boat while the Mercedes J-B Weld job cured. I had to layout the location of the Mount first then Holesaw the hole. After drilling the mounting bolts up to 5/16in from 1/4in I used a Cobalt 5/16 drill bit for the Stainless Engine Mounting holes.
All the 1708 S-Glass I layered in really beefed up the Deck. The Holesaw had a bit of grief sawing thru everything. I saved the plug for whoever buys this little boat so they can see the lamination themselves.
It is a quick detach design mount so if your towing locally you can swivel the engine around and secure it for towing or over the road, just pull a safety pin and the engine lifts off by the handles on top.
Super Moderator
* Crappie.com Supporter * Member Sponsor
Super nice work!
If your too busy to fish, youre too busy! Buddy Ebsen
PROUD MEMBER OF TEAM GEEZER
(Billbob and G approved!)
Proud member of Tekeums Jigs Pro
Staff
https://heavenornot.net/
heavenornot.net


