
 Reply With Quote
Forgot to post the quick lunch today. fried Bass (Bon Temps caught the first, the most, & the biggest the other day fishing with me - clean sweep). fried Jumbo shrimp, seasoned Steak fries, & Jalapeño Hushpuppies.


 HaHa: 0
 Crappie.com 2K Star General

Cranked Up on the Wash Station for Hog Fest today. The Crew's Tent site does not have water or power so no place to wash serving equipment or hands. This was what I was ask to find a solution for. They also had no way to haul this heavy Wash Station so that is where the previous project, the Trailer came from.
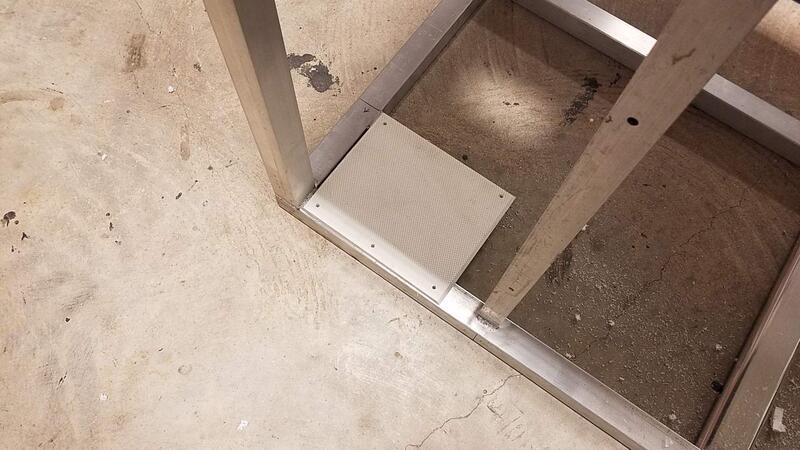
To get started I cut two runners and 2 transverse tubes to weld a rectangle that the tank fits inside of. I wanted the tank to be removable so the width allows that from the end panel. The hole drilled in the tube is on each end. See when welding if you don't provide a air path to bleed off the pressure its hard to seal weld something. I have a few jigs in the shop but this one is made for the need at hand. I get near perfect, flat, square joints using this fixture. It will provide perfect but this is a donation project, near perfect is good enough today.
I'm using my MIG to burn this project together. TIG is pretty but pretty slow too. All of this wash station will be skinned out in 90ga 5052 Marine Aluminum after painting the frame.
The Hold Down Brackets for the 65 gallon water tank sat up off the bottom of the tank quite a bit. I didn't like it and needed to support the weight of the tank so I fitted and welded this T-Top material (really Step material for ladders on boats) which is 1-1/4 inches thick allowing me to French the Tank into the frame taking up some of the clearance but leaving enough travel to securely hold the tank once bolted in place.
You can see there is still 3/4in clearance between the frame and the hold down brackets.
This fixture really makes it easy to get square joints in 3 planes.
Using my Miller 350P for this I loaded some old .030 4043 Filler wire I've had for years to use instead of the 3/64th 5356 wire I use for boat building. The 350P doesn't like the small diameter wire and the run-in was poor up to this point. I increased the run-in to 75% and it stopped the cold start to the weld it was feeding me and started burning in from the start.
I contacted the Chef at this point to ask if he wanted to wash from Left to Right or Right to Left. He's left handed so that answered the question, Left to Right. Then I was thinking of just letting the sink ride part on the frame but it looked too funny to me so I framed it in, offsetting from the edge a bit. See I can't mount this sink in the traditional way because the fasteners would tear out bouncing on the road. No, this has to be a Bullet-Proof install. I decided to sandwich the sink between a full frame-in and the counter top (King Starboard in this case).
I fitted the crossmembers super perfect so no distortion but a very tight fit. Now the sink will be locked in, immovable once the top deck is installed.
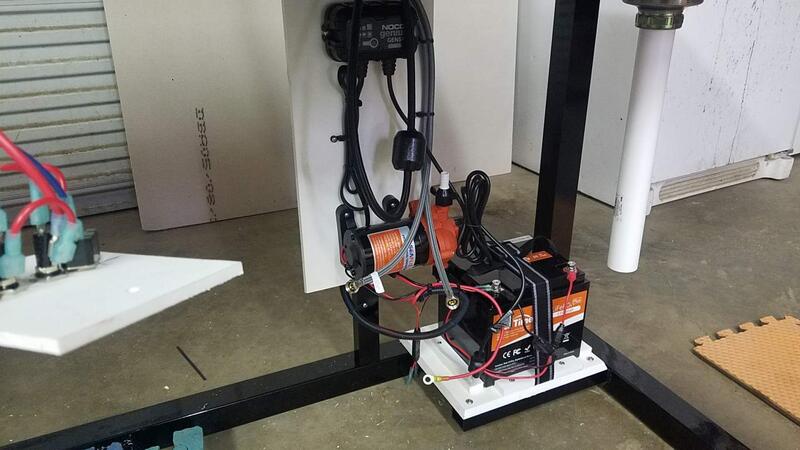
Here is where I stopped for the day, the frame is all welded up. Tomorrow I have to install mounting for a NOCO battery charger, a 50AH Lithium Battery from Drew, and a 12 VDC 30psi On-Demand water pump. All water supply plumbing will be handled with Garden Hose connections as 2 55gal external water tanks will be on the trailer too.
S10CHEVY LIKED above post
Crappie.com 2K Star General
Forgot to post the quick lunch today. fried Bass (Bon Temps caught the first, the most, & the biggest the other day fishing with me - clean sweep). fried Jumbo shrimp, seasoned Steak fries, & Jalapeño Hushpuppies.
If I die from a Deadly Sin it will be Gluttony!
"Formerly known as rojoguio"
Super Moderator
* Crappie.com Supporter
Crappie.com 2K Star General
Cut the Table Top today, just a rough out. I need to run the router inside and out to finish off the edges.
Added a Battery Charger and On Demand Water Pump Panel including the stanchion to mount it to.
Lastly a battery mounting base was needed so I welded up a support and made a base to mount the battery.
Super Moderator
* Crappie.com Supporter
Awesome work and lunch
The love for fishing is one of the best gifts you can pass alongRojo thanked you for this post
Crappie.com 2K Star General
I cut the Top for the table, ran a router around the edge too to clean it up more.
Took the DA Sander to the frame, wiped it down 3 times with Acryl-Clean and got ready to spray.
# coats of PPG Refinish AUE-370 Urethane and now curing time.
When I told them how much 2 sheets of aluminum would cost to skin it out they decided to punt and just go with a painted frame.
Super Moderator
* Crappie.com Supporter
Super Moderator
* Crappie.com Supporter * Member Sponsor
Wow! Beautiful work!
If your too busy to fish, youre too busy! Buddy Ebsen
PROUD MEMBER OF TEAM GEEZER
(Billbob and G approved!)
Proud member of Tekeums Jigs Pro
Staff
https://heavenornot.net/
heavenornot.net
Crappie.com 2K Star General
This evening I started final assembly of the Wash Station. Finished off the open ends of the tubing with some Trim Caps. Mounted the Battery Charger / Demand Pump panel. Sandwiched the Sink between the frame and Counter Top. Set the Battery base and Li Battery. Still need to offset mount the Faucet Assembly, Bolt the Tank in, add the switches for the pump & lights (came up with a cool way to deal with that), and I'm adding a snap on front canvas - totally ascetics, just to Jazz it Up.

Crappie.com 2K Star General
I cut 4 Starboard Blocks to screw down fitting the battery bottom profile to prevent any side movement then installed along with the blocks a NOCO Battery Strap. All wire & wire terminals are marine grade.
The wiring was installed in Convoluted Tubing, Tie Wrap secured with stainless screws close together for a long lasting wiring harness.
Since they decided against skinning the table out I needed to install the switch panel I made in such a way no water could splash on it. The switches and fuse holders are Blue Sea Systems, my preferred brand of Marine Electrical Components.
I recommended we install the Faucet so it swung to the left of the sink not centered but the swing is so wide center turned out to be the best spot.
This picture just shows how the wiring & hoses were secured. A 2 prong marine plug is in the picture here, that is for the Canopy lights so they can unplug the lights from the Wash Station when not in use.
Finally ready to go. The owners are buying the hose & fittings to hook the water lines up. Delivery tomorrow.


