
 Reply With Quote
You sir are having too much fun!

 HaHa: 0
 Crappie.com 2K Star General

Hurricane season is upon us here on the Gulf Coast and one of the Boat Evacuation Trailers is in bad shape. I need to knock this job out. Hopefully I can pick up the timbers I need Monday at a local Boat Trailer Manufacturer.
I re-carpeted this trailer 7-8 years ago. Also had to swap the Main Timbers around, drill some new holes, and cut off the Rot to squeeze more life out of them. This is a 2003 trailer that sits out in the weather without a boat on it. Weathered damage needs repairs.
The last time this trailer was in here I replaced the inner bunk boards, they are fine just need carpet. I also replaced the Aluminum Timber Brackets with these Hot Dipped Galvanized brackets and upgraded the center brackets from single U-Bolt brackets to these HD Double U-Bolt brackets.
Where to begin in testing the lites? First I just plug in the battery to the trailer with the jumper harness I made. It lets me test each circuit individually. The running lites worked on Port side but 1/2 the LEDs in the Stop/Park lite fixture were toast. The Stbd side didn't work at all, 4VDC voltage drop out of the plug to that leg. The crimp on wire tap at the Side Marker lite was bad, and mice had chewed the wires in the back at the Stop/Park lite. While repairing the splice I happen to tug on the fixture leads and they moved. "That's not supposed to happen" I thought. Grabbed a Phillips #2 and removed the cover. The photo shows the LED plate had rusted loose as well as corroded to the point of not working. New Light fixture time! The trailer bonding ground connection was corroded too along with the inside of the plug itself so I slapped a new wishbone Harness on to cut my time losses.
I have a Jethro sized Wonder Bar, about 2ft long. Makes stripping carpet and staples a breeze. Of course all I use is Monel 9/16in staples, they are like the day I shot them in. No saving the Timbers this time, Rot is too bad. Sport-Trail boat trailers is 10 minutes from me here, we actually use the same Aluminum Vendor, they deliver there first then bring me all the pretty Anodized stuff for making T-Tops. Monday I hope they will sell me a couple of timbers. Till I get replacements I have to leave the originals in place for measurements.
This time I'm adding Bunk Slicks to all the bunks to help the job last a bit longer. More later.
Last edited by Rojo; 02-18-2024 at 07:11 AM. Reason: correct name
Super Moderator
* Crappie.com Supporter * Member Sponsor
You sir are having too much fun!
If your too busy to fish, youre too busy! Buddy Ebsen
PROUD MEMBER OF TEAM GEEZER
(Billbob and G approved!)
Proud member of Tekeums Jigs Pro
Staff
https://heavenornot.net/
heavenornot.netRojo LIKED above post
Crappie.com 2K Star General
I warned Slab, I keep a lot of projects. What's that saying "A body in motion stays in motion" or something like that.Originally Posted by BuckeyeCrappie

I never knew how to sit still.
Super Moderator
* Crappie.com Supporter
Great work
The love for fishing is one of the best gifts you can pass alongRojo thanked you for this post
Crappie.com 2K Star General
So these timbers are 3x12x12ft still wet. I don't know how much they weigh each but it's all I can do to pick one up. I shortened the Timbers to the original length of the existing Timbers before I had to cut them 8-9 years ago due to rot on the ends. Back the last time the trailer was here for new hubs, carpet, inner boards, wires, & lites I could only cut the existing rotted ends off, relocate the best wood to the back, mount, and carpet. This time no way, too much rot now. I had to buy a Deep Rip Blade for the saw, 2-3/4in was the deepest rip blade Home Depot had. Boy what a fight to get this done.
No way was these timbers going to slide at all on my portable table saw so I had to scrape up the roller stands. I had the stands but only installed the rollers on 2 of them. The rest had V-Rests I had made and I used the height adjustability to hold the T-Top Top sections. I fabricated them separate from the Risers then married the 2 halves together upside down on these stands. The V-Rests being aluminum gave me a good ground thru the anodized aluminum. I placed the timbers first then set up the saw out in front.
I used a stick of 2x5 aluminum tubing as a straight edge to perfectly align all the rollers. then to level the saw to the rollers I had to shim the saw legs on the low side to level everything up. Afterwards to reduce the chance of the saw moving I placed my welding weights (25# bag of Lead Shot in a box) in front of the legs to prevent them from moving.
As I was sawing the Timber I kept moving the roller stands closest to me around to the exiting side of the saw.
The cut beam was then stood up to clean up the edge where the blade left a 1/32in sized lip.
You can get a idea of how much had to be cut off the originals. The Timbers weren't bad, $85ea but man were they heavy. Dinner time......................
Super Moderator
* Crappie.com Supporter * Member Sponsor
Very smart method. Thanks for sharing your progress
If your too busy to fish, youre too busy! Buddy Ebsen
PROUD MEMBER OF TEAM GEEZER
(Billbob and G approved!)
Proud member of Tekeums Jigs Pro
Staff
https://heavenornot.net/
heavenornot.net
Super Moderator
* Crappie.com Supporter
Good work
The love for fishing is one of the best gifts you can pass along
Crappie.com 2K Star General
Everything hurts today brother, man the Advil stock will shoot up on Wall Street. At my age, carrying those timbers, stepping thru the trailer frame with them in hand, joints hurt today I didn't know I had.
Crappie.com 2K Star General
Spent the day yesterday finishing up this trailer so I can get it out. Our 2017 Escape with (45K miles) needs new rear shocks. Both pouring oil. This car is turning into a Lemon.
Anyway, first I had to measure and make measuring wires for adjustment of the new Timbers height. I cut 3/32in TIG filler wire (very straight and stiff) to match the height of the inner angle of the existing timbers. Each wire is kept right at the measurement site till needed for setting the New Timbers. I use shims, whatever I can make it out of the get the exact height of the new Timbers while setting the Timbers for a 36 inch setback.
At this point the Timber mounting brackets are clamped to the Timbers and their mounting U-Bolts tightened.
Now that any potential slack is out of the Timber mounting brackets I set up to drill the holes for the Bracket to Timber Bolts. Using long drilling bits makes it to much easier to see the level and angle of the bit. I only had to slightly drill one hole from the backside to align it.
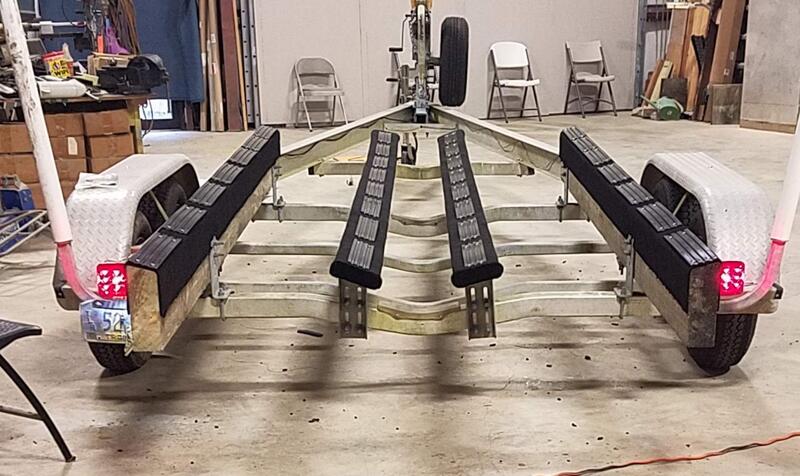
The cut edge of these Bunk Timbers are always left sharp. Cuts the Carpet. I take a fiberglass grinder and put a radius in the top 2 edges of the Timbers before Carpeting.
Since I installed 2.5 Marine treated Whaler Bulkhead Timbers and am using Bunk Slicks the carpet is just for looks as well as killing any UV that over years of time burn the wood. I never install Bunk Slicks without carpet. It has Never happened but I fear the Bunks Slicks pulling free and a hull loading on bare wood. I only use Monel Staples shot in with a Air Stapler made for the job using 60psi of pressure.
A 2x4 block of wood makes the perfect spacer between the Bunk Slicks. I installed new Lites, jacked up each wheel to grease the bearings while spinning them, checked the lite circuits individually before blessing the job for departure.
 Super Moderator
* Crappie.com Supporter
Super Moderator
* Crappie.com Supporter


