Reply With Quote
get your jig heads a little hotter, just to the point where the paint sticks, then put it back over the heat to set the paint. I heat mine with a can of sterno and use a pair of hemostats. Its a timing thing. Good luck.

 Likes: 0
 Thanks: 0
 HaHa: 0
 Crappie.com Legend

I'm just starting to paint jigheads. How do you put the paint on the heads without getting too much on them? I don't like wasting the paint and I don't like coneheads either!!! HELP!
Keeper
get your jig heads a little hotter, just to the point where the paint sticks, then put it back over the heat to set the paint. I heat mine with a can of sterno and use a pair of hemostats. Its a timing thing. Good luck.
Crappie.com 2K Star General
Each color has its own consistency. You have to play with your heat if you are dipping out of the jar to get it right. I like using a fluid bed....fluffs the powder up and gives you a lighter coating and more flexibility. Some colors like black do not lift very well and you are better off dipping out of the jar and giving it a hard tap to shake off excess. Hope this was some help
Crappie.......its whats for dinner!!
Slabmaster II
As kennyb says, it's a timing thing. I use a small alcohol burner (with denatured alcohol) and I've found about 4 seconds is about right. (Mostly 1/16 and 1/8 oz.) I use a pair of needle nose plyers or hemostats and count 1-2-3-4 with each count turning the jig head 180 degrees to attempt to make sure it is evenly heated. Then I quickly swish it in the powder paint.....the faster the better it seems. If you do it too slow, it will stay thicker and clump up more.
One thing that seems to really help is to make sure the powder paint is fluffy. Every few jigs, I put the cap back on the jar and shake it up real well. That really seems help it from going on too thick.
Crappie.com Legend
I am sure everyone has there own way of doing it, I used to just use a bic lighter, but my thumb would get sore, so I went to a elec. heat gun that I can clamp in the vise, then just turn the switch on and hold the lead head by the hook just below the heat and rotate the jig a little then dip quick and bring back up in the heat and make sure the hook is not sealed with paint, then hang on the rack to dry, I like many after about 5 I put the lid back on and shake the powder up again to fluff up, I have one jar of chartuse that is 8 years old and still half full, I find a jar last a very long time so don't worry about wasting a little once in awhile.....
A FISH IN THE PAN IS WORTH TWO IN THE LAKE
Moderator MO OT and MO Tournaments
* Crappie.com Supporter
Lots of ways to do it. I paint about 250-500 a week now and do it differant than everyone that has posted. But the main key no matter how you heat them is to make sure the paint is fluffed up good or use a fluid bed to do it for you. Each color takes a differant amount of heat to get the same results so you have to play around a little. I have 15 to 18 differant colors and they all are a little differant and react to the heat in differant ways.
Slabmaster II
Care to share?Originally Posted by Jigging15

Crappie.com 1K Star General
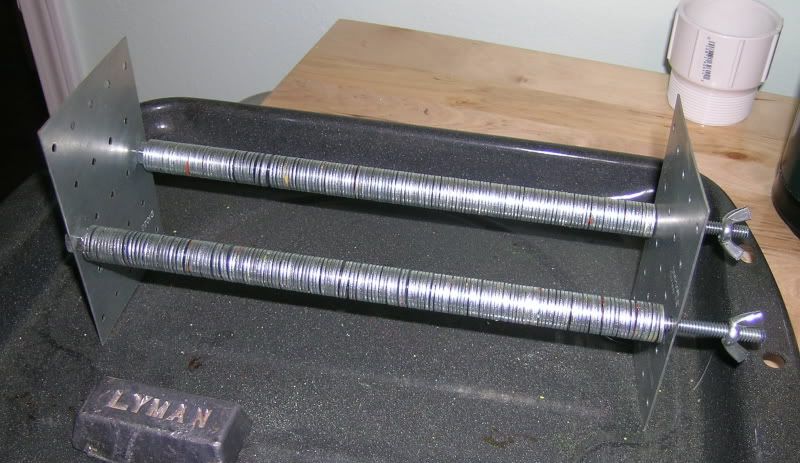
I also paint a lot and wouldn't do without a fluid bed. This a a contraption I made to eliminate the cone heads. A couple pieces of all-thread 12" long, 2 deck braces, 4 nuts, 2wing nuts, and about 300 washers. Hang your jigs, tighten the wing nuts, turn over, bake at 350 for 20 min., and your done. Extra paint goes down the hook shank.
PROUD MEMBER OF TEAM GEEZER
Always shoot for the moon, if you miss you'll still be among the stars.
Moderator MO OT and MO Tournaments
* Crappie.com Supporter
You can also lower the heat tempature and up the length of time you cure them and get the same result. That is how you have to do the jigs with fiber or plastic weed guards. I cure mine in a toaster oven at around 300 but run it through two cycles of 20 minutes. Never had complaints or seen chipping myself. But I usually fish wood and not around rocks much. Did find a few more colors today online that I do not have yet. Time for another Barlows order I guess. Oh one more thing that can change the way a jig takes paint and the heat needed is the quality of the lead. I have bought a few thousand jigs in the last couple months and from about five differant people and they all are a little differant also. Props to a MO member who pours a great jig that takes paint well is Bugman. He does a great job. Jamie if you read this I gave a guy at everharts your number looking for some 1/16 oz with no collar. Inasked if he was tying and he said no. It is for a small plastic bait he pours and the collar and barb is to big on a normal jig. So je wants collarless and will glue them to the head.
Crappie.com Legend
I use an electric heat gun, and I find when I run it on high I hold a jig head in there for four or 5 seconds. You want it to melt on, but if you bake them, you just need to have powder paint on it. The oven will do the rest. When I first started I baked a batch that had paint in the eyes, they ended up in the trash. Just painting them with powder gives you a decent finish, but baking them makes it almost bullet proof. With Jared baking them twice, I'd imagine his are grenade proof.
It's a great, inexpensive way to paint your own. It takes a little longer, but it's so worth it.
Posting Permissions