


not sure what a pinmin is but I am curious as always. :rolleyes:

 Likes: 0
 Thanks: 0
 HaHa: 0
 Crappie.com Legend - 2022 Crappie.com Man of the Year
* Crappie.com Supporter
Crappie.com Legend - 2022 Crappie.com Man of the Year
* Crappie.com Supporter

These ice spoons or pinminnows are being used year round by panfishermen. They are as effective in "hard" water as in "soft" water. They are everything you want in a jig!
Danger! Danger! attracts fish who are looking up for food! The marabou action drives crappies wild! This lure has color, flash, vibration and is the ultimate jig!
Here are a few samples of mine that you can imitate / duplicate or replicate.
People fish them year round under a slip bobber. The nickle finish acts like a flash under water. The small weight of the pinmin gives stability to the hook yet it is easy for the fish to inhale. You can get the shells at Jann's Netcraft. Solder the hook to the shell, paint, tip with a wax worm and fish on!
This is what I found on Crappie.com - Crappie Fishing Information and More
QUOTE: Make your own ice fishing lures, ice jigs
QUOTE:
"Our ice blades are popular with ice fishemen wishing to make their own custom ice jigs. Ice blades are usually soldered to Mustad 3282 (nickel) and 3260B (gold) hooks. Bronze hooks will NOT solder unless you scrape the finish off. Ice jigs are being used year round by panfishermen. Ice jigs are deadly when jigged for bluegill and crappie. Ice fishing solder is especially formulated to solder the nickel, brass, silver and gold found on ice jigs."
It is a known fact that all fish will eat off the bottom. Different “Search lures” have been in existence for over 30 years. The beauty of my rig that I personally created and solder together is that it can be used as a search lure, a dropper rig on the bottom and also fished very effectively beneath a slip float. When fished under a slip float the waves will impart all the action that is needed.
I fish it as a dropper loop setup. Tip with maggots.
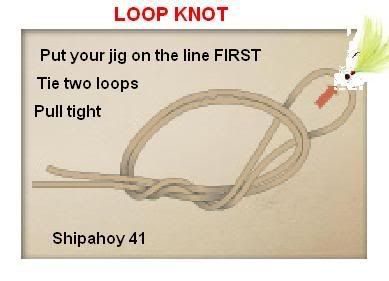
This is the knot I use to tie the jig to the line........
SURGEON'S LOOP KNOT
1) Place your jig on a line
2) Hold the jig in your hand and pretend you are tying your shoelace
3) Run your jig through the loop (Twice) and pull tightly.
(ALTERNATE AND EASY WAY) ..... Fold over the tag end of line and form the knot using both strands to make a double overhand knot. Pull up carefully on both ends and the loop.
This is a more "Fancy way" to tie it. I just use the simple way mentioned above.
http://www.youtube.com/watch?v=Qlbv_8s7dPg
http://www.flyfishlouisiana.com/nonslip_loop_knot.htm
The weight or sinker is tied using a palomar knot.... http://www.animatedknots.com/palomar/index.php (The Palomar Knot video)
Getting ready
Once I get my tools rounded up I like to plug in my soldering iron and let it heat up while prepping my materials. First things first, the tip of the soldering gets hot - up to 800 degrees Fahrenheit, so don't touch it. If you're using a new soldering iron you will want to put a small amount of solder on the tip of the hot iron before you start working. This is called tinning the iron and you only have to do it with a new iron. Once you start using it will usually have some solder on it already and be ready to go.
HOW TO SOLDER
Soldering is defined as "the joining of metals by a fusion of alloys which have relatively low melting points". In other words, you use a metal that has a low melting point to adhere the surfaces to be soldered together. Soldering is more like gluing with molten metal than anything else. Soldering is also a must have skill for all sorts of electrical and electronics work. It is also a skill that must be taught correctly and developed with practice.
Ice blades are usually soldered to Mustad 3282 (nickel) and 3260B (gold) hooks. Bronze hooks will NOT solder unless you scrape the finish off.
Soldering is nearly instantaneous, if the solder doesn't flow around the work in 1/4 of a second then something is wrong and you need to start over again.
Don't let the joint move until it has cooled enough to set, it should look mirror shiny all around.
This document attempts to teach soldering through a few simple steps. Tips and tricks are also provided at the end.
How To Solder
Step 1: Equipment
Soldering requires two main things: a soldering iron and solder. Soldering irons are the heat source used to melt solder. Irons of the 15W to 30W range are good for most electronics/printed circuit board work. Anything higher in wattage and you risk damaging either the component or the board. Note that you should not use so-called soldering guns. These are very high wattage and generate most of their heat by passing an electrical current through a wire. Because of this, the wire carries a stray voltage that could damage circuits and components. The choice of solder is also important. One of the things to remember is to never use acid core solder. Acid core solder will corrode component leads, board traces and form conductive paths between components. The best solder for electronics work is a thin rosin core solder. I prefer a thickness of 0.75mm, but other thicknesses will also work. Just remember not to get anything too thick.
Remember that when soldering, the rosin in the solder releases fumes. These fumes are harmful to your eyes and lungs. Therefore, always work in a well ventilated area. Hot solder is also dangerous. Be sure not to let is splash around because it will burn you almost instantly. Eye protection is also advised.
Getting ready
Once I get my tools rounded up I like to plug in my soldering iron and let it heat up while prepping my materials. First things first, the tip of the soldering gets hot - up to 800 degrees Fahrenheit, so don't touch it. If you're using a new soldering iron you will want to put a small amount of solder on the tip of the hot iron before you start working. This is called tinning the iron and you only have to do it with a new iron. Once you start using it will usually have some solder on it already and be ready to go.
Wipe the tip clean on the damp sponge to remove oxidation.
Once the iron reaches temperature (some irons take minutes to do this and some irons take seconds), I like to clean the tip of my iron on a wet sponge. You can wet the sponge on your soldering base if you have one, or you can just use a damp sponge or steel wool. Gently touch the tip of the soldering iron to the sponge and clean off any old bits of solder that might be stuck to it. It will sizzle a bit; this is normal.
Step 2: Surface Preparation:
A clean surface is very important if you want a strong, low resistance joint. All surfaces to be soldered should be cleaned with steel wool and some sort of solvent. Lacquer thinner works well. Some people like to use sand paper, but I think that it is all too easy to sand right through circuit board traces, so steel wool is my preference. Don't neglect to clean component leads, as they may have a built up of glue from packaging and rust from improper storage.
Step 3: Component Placement
After the component and board have been cleaned, you are ready to place the component on the board. Bend the leads as necessary and insert the component through the proper holes on the board. To hold the part in place while you are soldering, you may want to bend the leads on the bottom of the board at a 45 degree angle. Once you are sure that the component is properly placed, you can more on to the next step.
Step 4: Apply Heat
Apply a very small amount of solder to the tip of the iron. This helps conduct the heat to the component and board, but it is not the solder that will make up the joint. Now you are ready to actually heat the component and board. Lay the iron tip so that it rests against both the component lead and the board. Normally, it takes one or two seconds to heat the component up enough to solder, but larger components and larger soldering pads on the board can increase the time.
Step 5: Apply Solder And Remove Heat
Once the component lead and solder pad has heated up, you are ready to apply solder. Touch the tip of the strand of solder to the component lead and solder pad, but not the tip of the iron. If everything is hot enough, the solder should flow freely around the lead and pad.
Once the surface of the pad is completely coated, you can stop adding solder and remove the soldering iron (in that order). Don't move the joint for a few seconds to allow the solder to cool. If you do move the joint, you will get what's called a "cold joint". This will be discussed shortly.
Step 6: Cleanup
After you have made all the solder joints, you may wish to clean with steel wool or solvent to remove all the left over rosin. You may also wish to coat the bottom of the board with lacquer. This will prevent oxidation and keep it nice and shiny.

Last edited by shipahoy41; 10-29-2009 at 06:50 AM. Reason: changed title
Aquatic Species Removal Engineer.
May God be with you. Keep CALM and STAY ANCHORED with your faith.
Crappie.com 1K Star General
not sure what a pinmin is but I am curious as always. :rolleyes:
Slabmaster
Pin minnow? I have some glow ants and darters that im going to make up.
Minnow
WE HAVE THEM BY THE THOUSANDS ALL SIZES AND SHAPES, WATCH FOR OUR WEB
SITE NEXT WEEK (WWW.GRANDPABOBSCRAPPIEJIGS.COM) WILL TRY TO POST SOME PICS
GRANDPABOB[/IMG]
WWW.Grand-pa Bob's Custom Crappie Jigs./SponsorCrappie.com
Slabmaster
Ship, ever make anything in the 1/100-1/50 size?
Minnow
FIRETIGERWILLOWLARGE-1.jpg - Image - Photobucket - Video and Image HostingMIGHT HAVE THE PICS NOW
GRANDPA
WWW.Grand-pa Bob's Custom Crappie Jigs./SponsorCrappie.com
Crappie.com 2K Star General
fishingbybob you have a pm
Crappie.com Legend - 2022 Crappie.com Man of the Year
* Crappie.com Supporter
Originally Posted by redear

This is what people in Ohio called a pinmin. (Pin Minnow) It is deadly on 'Gills and Crappie when tipped with a wax worm
Solder a hook to a shell (Get them at Jann's) and powder coat the Pinmin while it is still warm.
Last edited by shipahoy41; 11-24-2008 at 04:07 PM.
Aquatic Species Removal Engineer.
May God be with you. Keep CALM and STAY ANCHORED with your faith.
Crappie.com Legend - 2022 Crappie.com Man of the Year
* Crappie.com Supporter
I have done them as special orders. Usually I have most requests for 1/64, 1/32, and 1/16th. That usually takes care of most bream, Shellcracker and of course Crappies.
Aquatic Species Removal Engineer.
May God be with you. Keep CALM and STAY ANCHORED with your faith.
Crappie.com Legend - 2022 Crappie.com Man of the Year
* Crappie.com Supporter
This is the picture he is referring to. I copied and pasted his IMG codes.

Aquatic Species Removal Engineer.
May God be with you. Keep CALM and STAY ANCHORED with your faith.
Posting Permissions


